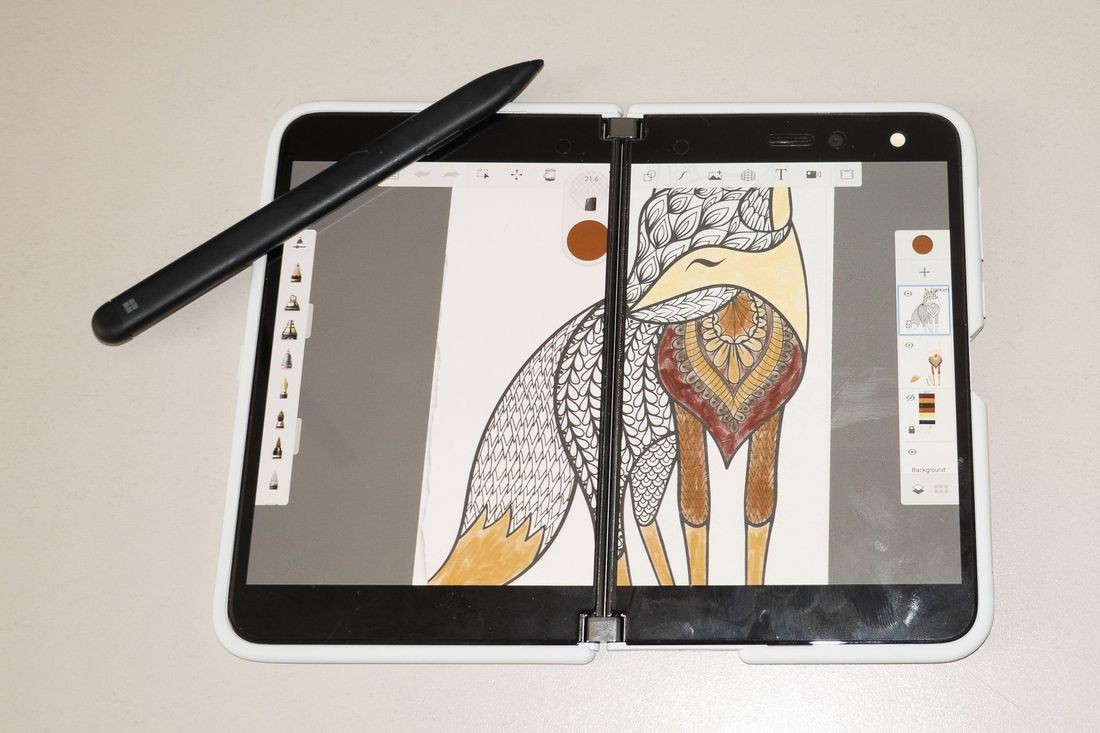
Figure 1: An in-progress coloring page
Analog?
Back to ToC | Back to page menuI’ve spent a long time staring at my sketchbook and wanting to draw and color but… my desk situation is such that I’d have to spend at least 5 minutes getting it cleared enough for drawing/coloring, then I’d have to put it back the way it was so I could type when I was done, I’d have to turn on the light at night (I like dark).
You see where this goes.
I’ve given up on Analog at this point for my coloring and drawing desires. My current living space isn’t setup for it and the annoyance of re-configuration outweighs the desire most days.
Back to ToC | Back to page menuDigital?
Back to ToC | Back to page menuGiven I gave up on Analog coloring and drawing I figured it was time to really commit to figuring out the mobile landscape for coloring and drawing. Note I intentionally avoided making desktop or laptop computers a requirement for my setup. I want to have this whenever/wherever in it’s simplest form.
After some research into digital coloring and drawing I nearly walked away completely. Digital is a messy land of choices. Much like Analog there are a ton of options and you can go wrong, you can go right and everywhere in between.
Unlike Analog, there is no ’the humble pencil and paper’ to fall back upon if you get overwhelmed. Thankfully I’m a stubborn human at times and found a good blend of options that get close to pencil/paper for simplicity and utility.
Back to ToC | Back to page menuWhat
Back to ToC | Back to page menuThe below will outline what I’ve managed to put togther for myself that works well, gets out of my way (read: simple) and works with my finger or a ‘real stylus’. Basically the equivalent of pencil/paper that can get fancy if you desire. However, much like pencil/paper you don’t need to dive deep to succeed.
The intent here isn’t to become an artist using an iDevice living the Coffee Shop Life. It’s to make coloring and drawing like Zentangle (link) easy and more accessible. Ideally in a way that scales to match the moments desires.
See the Complete Coloring Page screen shot for a complete coloring page of mine.
Back to ToC | Back to page menuRequirements
Back to ToC | Back to page menuThe only hard requirement for this setup is Sketchbook (link) from your preferred app store. The app itself is a simple looking drawing app (see screenshots below) but it has a lot of standard tools like image import, multiple brushes, full color palatte, eye dropper, layers and more. The website has a good FAQ and breakdown of features. I’ll leave the devs to showcase the apps features.
This app was the key to unlocking the setup. It’s available on iOS and Android for both phones and tablets. The interface is clean and simple despite having all kinds of tools available. Don’t let the feature list overwhelm you, they are wholly optional and will stay out of your way for the most part.
For more detail on how I use the app, see the Approach section below.
Back to ToC | Back to page menuNice To Have
Back to ToC | Back to page menuA stylus is a nice to have for this setup. I myself use a Surface Stylus with a Surface Duo primarily but also use an Adonit Dash with my phone when I don’t have my Duo handy. Note this is not a requirement but can make/break the feel of the setup for some.
There are basically 3 options here:
Device stylus
Back to ToC | Back to page menu- Common Options: Apple Pencil / Surface Pen / S-Pen
- Pros
- Best precision of the stylus options
- Allows for finger/palm rejection to be setup
- Cons
- Requires device support
- Usually battery powered and requires charging
Active stylus
Back to ToC | Back to page menu- Common Option: Adonit Dash (link)
- Pros
- More precise than standard stylus
- Does not require device support
- Cons
- Battery powered and requires charging
- Less precise than device stylus
Standard Stylus
Back to ToC | Back to page menu- Common Options: Adonit Jot / Adonit Mini (link) / Rubber nub stylus
- Pros
- More precise than finger
- Does not require device support
- No battery
- Cons
- Less precise than active stylus
- May be harder to see where you’re coloring/drawing
In My Opinion…
Back to ToC | Back to page menuEach has its own pros and cons. I myself prefer the device stylus option over others but use an Adonit Dash if no device stylus is avilable.
Each option is valid and can make a big difference for how coloring and drawing using a digital device feels. I definitely couldn’t use my finger as the primary way to color a picture. I need a bit more ’traditional’ feel but others I know prefer their finger.
Back to ToC | Back to page menuApproach
Back to ToC | Back to page menuMy approach to both coloring and drawing with Sketchbook is simple but super powerful. The key to the setup is having 4 layers, including the background.
Note: you can import your coloring page and just start coloring, nothing wrong with that. The below unlocked a lot of utility for me and some others I know. The approach below can make a very large difference for how the digital coloring and drawing experience feels.
Pan/Zoom/Rotate
Back to ToC | Back to page menuIn general I make heavy use of pan, zoom and rotate. They are the only two finger shortcuts in the app and if I hold a stylus comfortably I can still use two fingers for moving around my focus easily and fluidly. It took a little practice but made a big difference for me.
Color Palate
Back to ToC | Back to page menuFor choosing a color palate I generally use Coolors (link) to generate a random color palate. I highly recommend this site if you don’t want to build your own set of colors.
One trick with the site that I found really interesting: there is a little lock on each color shown on the generator output page. If you select the lock it’ll lock the color so you can generate another palatte with that color as included. You can do this multiple times. Can be helpful for quickly finding complimentary colors to one that stands about above others.
I normally stick to a maximum of 5 colors for my images but that’s a personal preference. This is art: let the mood strike.
Brushes
Back to ToC | Back to page menuI personally prefer charcoal and pencil brushes in Sketchbook. However, options like paint, pen, others are available if you use the layering approach I describe in the Layers section to retain the image detail.
If you’re not sure go with a pencil/marker brush and see how it feels. This may take a little time to sort as you find your preferences.
Layers
Back to ToC | Back to page menuI chop up my drawings and coloring pages into multiple layers. This is due to me wanting to keep the detal work above the coloring and shading without having to go back to cleanup when done coloring/shading. I’ve also worked on multiple images at the same time and try to keep some additional info ‘handy’ in case I don’t work on an image for a longer period of time.
This approach works really well for flexibility while not being too complex overall.
That said: this works for me and others I’ve talked to. Your mileage may vary.
Layer 1
Back to ToC | Back to page menuI setup the upper most layer as the coloring page / main drawing outline using the image import tool. I also set the blend mode to Darken. This lets me see the coloring page (or drawing) details above any colors or shading I add to the image.
This also lets me ignore the white background most coloring page PDF and image files have. By using Darken for blending, the white image background has no effect on the final image and essentially becomes transparent.
See the Blending - Darken and Blending - Normal screenshots below for how this works and can be setup.
Layer 2
Back to ToC | Back to page menuI setup the 2nd highest layer to be coloring / shading. This is where I do all my coloring work in particular. By doing this on a layer separate from the main coloring page I can use opaque brushes (like paint ones) that would obscure a lot of the coloring page detail or my own drawings details.
Isolating my shading and color as a dedicated layer really helped me with some of the brush types like pens and paint brushes.
See the In Progress Coloring Page screenshot for an idea how this will look as you work.
Layer 3
Back to ToC | Back to page menuI setup the 3rd highest layer to be notes and other information I want handy but not part of the final image. This includes my color pallate, brush notes and more. I keep this in my image for when I’m working but set the layer to invisible when exporting.
This is really helpful as I can now bounce between images as the mood may strike and not lose all the information I need to pickup where I left off.
See the Palate Layer screenshot for how I have this setup in my images.
Background
Back to ToC | Back to page menuI usually leave the background layer set to White. Feel free to adjust as you desire.
Sourcing Coloring Pages
Back to ToC | Back to page menuIf you’re looking for coloring pages both Patreon and Etsy have a lot of options available.
I’ve not had much of a problem finding pages via Patreon, Etsy and Google. I’ve even subscribed to a few patreon accounts to get regular updates from artists I like in the past.
Back to ToC | Back to page menuConclusion
Back to ToC | Back to page menuI feel like I need a conclusion here. The above is what I use for digital coloring and drawing as well as some general info I’ve collected over time.
A number of humans I know have run with this and had success.
Hopefully you can do the same.
Back to ToC | Back to page menuScreenshots
Back to ToC | Back to page menuComplete Coloring Page
Back to ToC | Back to page menu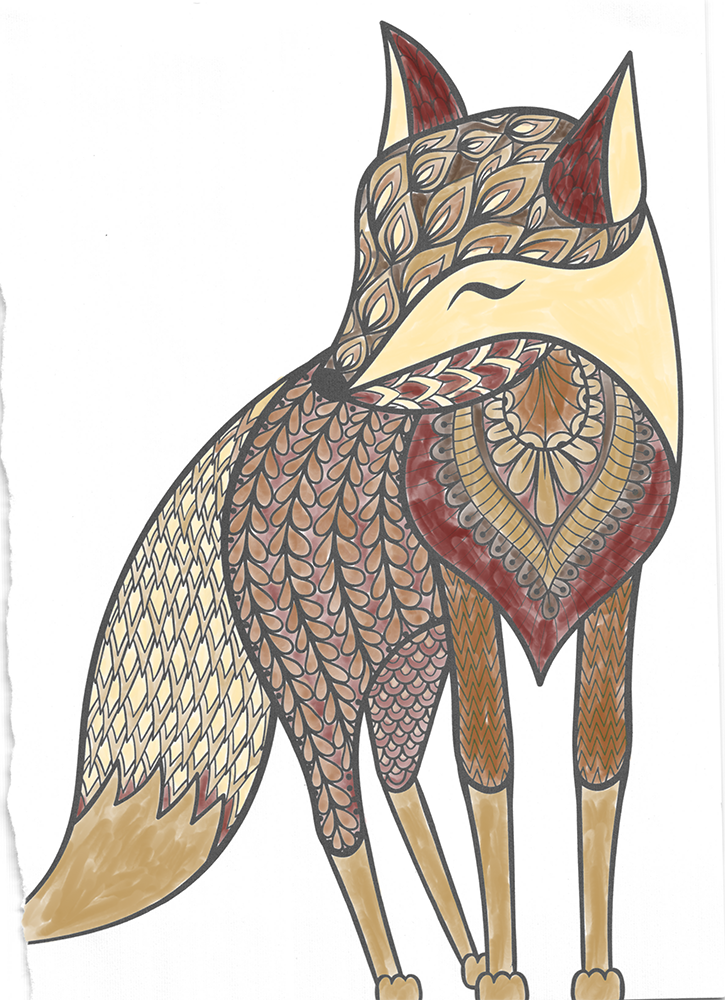
Figure 2: The completed coloring page
In Progress Coloring Page
Back to ToC | Back to page menu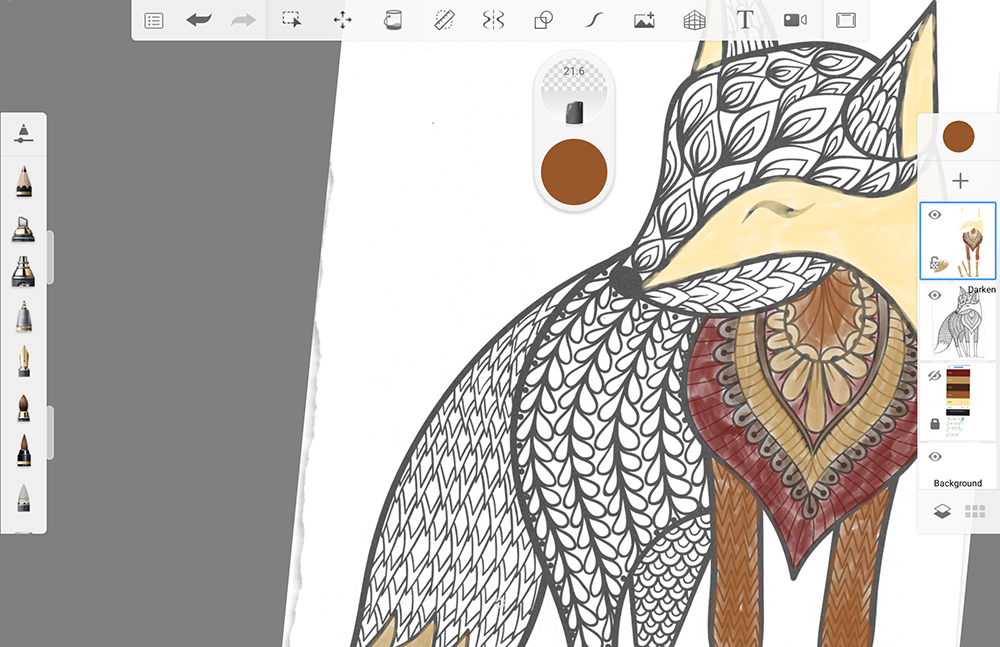
Figure 3: What I see as I work through coloring a page
Palate Layer
Back to ToC | Back to page menu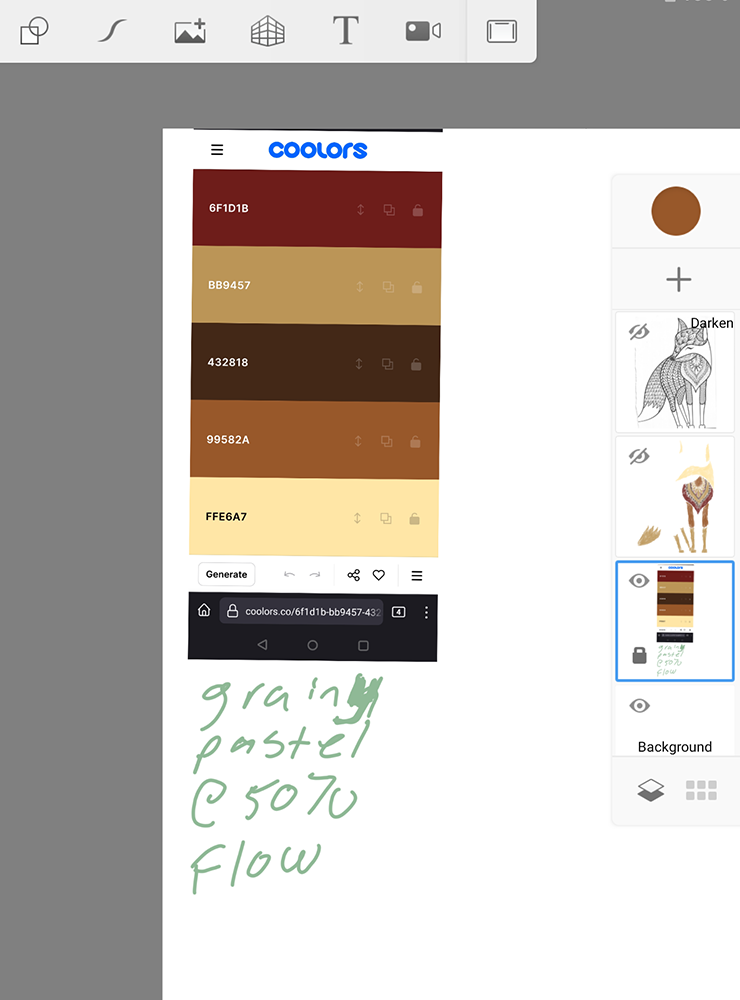
Figure 4: The layer with all the info I need to work on the drawing at any time
Blending - Darken
Back to ToC | Back to page menu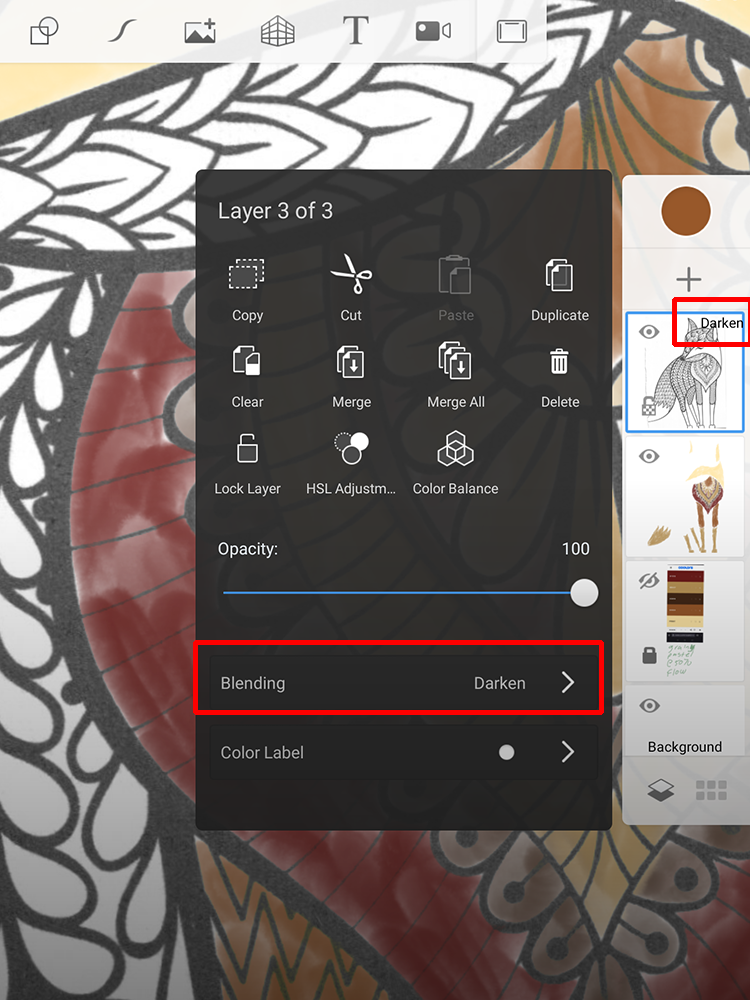
Figure 5: This is how I make the clean lines in the final image
Blending - Normal
Back to ToC | Back to page menu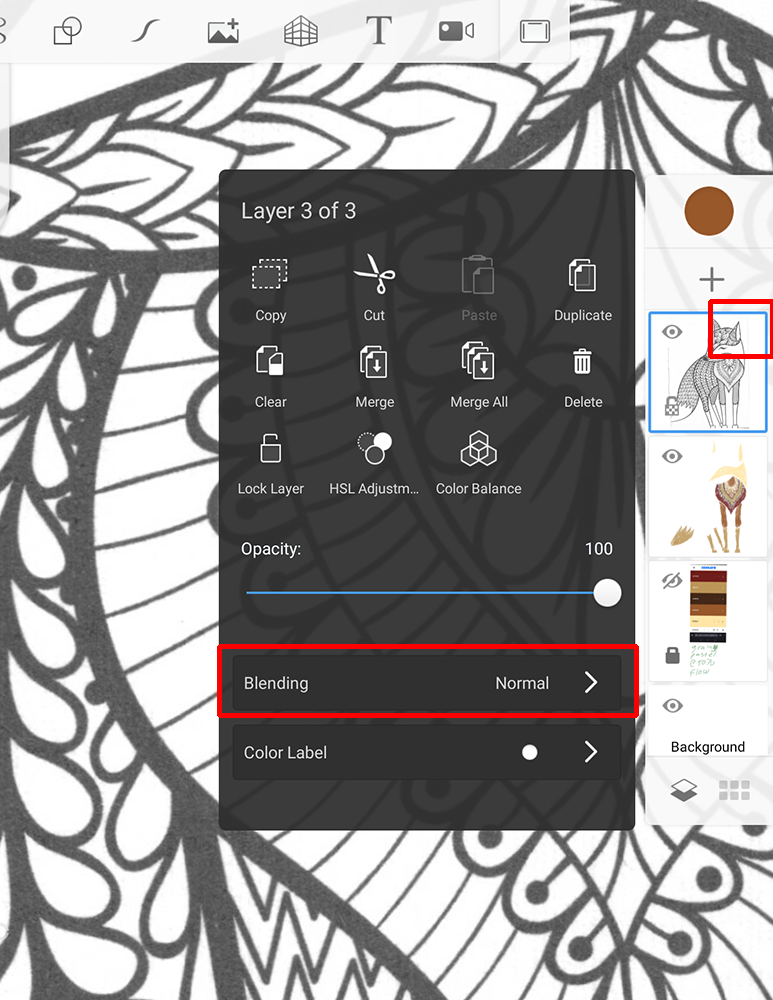
Figure 6: This is how I turn off the clean lines in images as I work
Advanced Coloring With Krita
Back to ToC | Back to page menuFor more advanced users and tablet users, Krita (link) is available. I personally prefer Krita as it has more advanced features around brushes and workflows compared to Sketchbook. I also find it easier to use for managing backups, images and some other items.
HOWEVER
Krita has a steep learning curve compared to Sketchbook and my approach to coloring with Krita matches Sketchbook for image setup and high level workflow. Sketchbook is 100% valid and I still recommend it over Krita day to day.
The below sections layout how I setup Krita overall and I leave the practical implementation of the below as an exercise for the reader.
Back to ToC | Back to page menuResources I found that may be worth investigating
Back to ToC | Back to page menu- [brush] Bic ballpoint: https://krita-artists.org/t/cheap-ballpoint-pen-brush/17170
- [brush] Copic Markers: https://krita-artists.org/t/realistic-copic-marker-like-brushes/41203
- [brush] Graphite: https://krita-artists.org/t/graphite-brushes-for-the-new-pattern-blend-modes/28036
- [brush] Sketch Pencils:
RM_Sketch_V1.bundlefrom https://files.kde.org/krita/extras/ - [brush] Charcoal:
Charcoal_KA.bundlefrom https://files.kde.org/krita/extras/charcoal/ - [palate] copic marker colors: https://raw.githubusercontent.com/maborotopia/Krita_resources/master/copic322_color.gpl
- [palate] copic colors (more robust): https://www.deviantart.com/d-signer/art/All-358-COPIC-Digital-Marker-Colours-ASE-ACO-GPL-765188823
Things to consider
Back to ToC | Back to page menu- bug fix input profile settings: https://krita-artists.org/t/cannot-save-input-profile-does-not-persist-on-startup-on-android/55693/4
- s pen click button is mouse middle click on galaxy fold devices
- pop up palatte is quick settings (like sketchbook puck)
- gestures in the config can likely do brush size up/dn and undo/redo
- can tune brush settings shown via the pop up palatte ui
- go through favorite brushes and set up to 10 ; these will show on the popup palatte
- use portrait mode when editing brushes ; you need the height to see everything and you can use the top of the pop-up window to move it left/right for full access
External storage resources folder
Back to ToC | Back to page menu- export/prep everything you want to keep (reuse desktop default resources dir if desired)
- settings -> resources
- use the ICON that pops the android folder selector
- select the folder you want to use and grant storage permissions to it
- save settings & quit krita
- force stop krita in app settings
- (ONLY IF REIMPORTING EXPORTS) - relaunch krita and import data
- copy the resources dir you want to use to the selected folder
- launch krita. this will take awhile and may look like its frozen
- clear any warnings/errors
- quit krita
- force stop krita
- relaunch and enjoy
Settings
Back to ToC | Back to page menu- general
- window
- disable HiDPI support
- tools
- tool options location: in toolbar
- disable ’enable touch painting
- misc (when krita starts)
- show session manager
- save session on exit
- window
- canvas input settings (use a non default profile / see above for saving fix)
- look for any gestures/touch/pen stuff that needs removing
- show pop up widget
- set to ’two finger tap’
- zoom canvas
- set gesture to five finger tap
- touch gestures
- set undo to four finger drag
- set redo to four finger tap
- set toggle canvas mode to three finger tap
- tablet settings
- adjust pressure curve
- pop-up palatte
- disable show rotation ring
- s pen actions
- click: toggle pop up palette with s-pen
- double click: show canvas only
- gestures: set all to do nothing
Changelog
Back to ToC | Back to page menu- 2023-04-05
- Adjust Krita S Pen configuration
- 2023-03-23
- Initial creation